Tear Sheets

Monday, 2 April 2012

Face of the Day Challenge Calendar

Hello Beautiful People!

The lovely Nymphette415 (@Nymphette415 on Twitter) has once again posted her FOTD Challenge Calendar! This is the first time I'll be aiming to take part in this every single day.

Here's the Calendar itself for April, 2012:


So yesterday was bold lips, and I've been having some skin issues, so I just did the mouth instead of the whole face. I used Milani's HD Advanced Lip Color in Vivacious Fuschia, topped off with Avon brilliant Shine Lip Gloss in Gleaming Mauve.


And here's what it looked like! 


So today's Challenge is simply titled "Coral". Since that's a colour I NEVER wear, I thought why not go for it!! So I went for it, on my eyes and on my lips. I used my Coastal Scents 88 Ultra Shimmer Palette and an L.A. Colors Lip Gloss in Sweet Melon. From the palette I used the bright Coral colour 4 shadows in from the bottom and 3 in from the right all along the outer 2/3 of my eye, up into the crease as well. The I used the shadow directly above that on the inner part of my lid. My highlight was the pale gold shadow at the very top, 2 in from the right, and the one 4 down from the top and 2 in from the right I used in the outer corner of my eye and in my crease. 


For the liner I used my NYX Slide On Eye Pencil in Jet Black to create an elongated wing, to lengthen my eyes, since my eyes are quite close-set and these kinds of colours can tend to take away the defenition of my features.The rest of my face I kept bronzed and healthy looking. I quite like the result!!!


Full Face w/ flash

Full Face - Natural Light (slightly overcast)


I know I look a bit shiny - it is SUPER hot in Barbados and I was under a hot light to boot!! But with this look I kind of like that natural glow.


Hope you enjoyed! Stay tuned for tomorrow's FOTD Challenge!!

Coral Kisses
Mandy

NOTD - 1930s manicure!

Hello Beautiful People! Wanted to share my Nails of the Day (Nails of the weekend, actually) before I cahnge my manicure!

I wanted to try an authentic 1930s manicure. Black and silver were very common colours used back then but you can use any two colours you want. Bear in mind though that for an authentic feel, go for a lighter and darker colour in the same family - for example red and pink (another common colour combination). If you use tdifferen colour combos it will look much more modern.

Sometimes 30s ladies would only do the half-moons in the lighter colour, but a lot of the time they would actually do the half-moons and the tips. I freehanded my nails because I had no guides, but you can, by all means, use guides, especially for the half-moons!

Apply the lighter colour all over the nail first (I used two coats of Lucer-tainly Look Marvelous by O.P.I.) and allow to dry. If you're using guides, I'd recommend applying one coat of a top-coat to avoid the stickiness of the guides possibly damaging the bottom colour. I skipped this step because I went freehand.

Next step, apply the darker colour over the center of the nail, leaving the lighter colour showing at the half-moon and at the tip. Try to keep your lines clean and even. I used Black Magic by Milani. Once everything is completely dry, apply one or two coats of Top Coat - I used Seche Vite.

Et Voila!!


Until next time! Sexy back-in-time nails and happy thoughts,
Mandy

Monday, 26 March 2012

Burgundy Smoke

Hello Beauties!!

I just have a quick Smokey Eye look for you wonderful people today! I want to devote Monday on my YouTube Channel specifically to quick makeup looks. SO here you go! This took me about 15 minutes, from beginning to end. This is an awesome look for you to master because you can substitute these colours and have so much fun adapting this look to suit you, and it really helps you look glamorous if you're on a time-budget, especially those crazy-busy moms out there, like me!


This look is simple but serious glamour!


Oh how I HATE my eyelashes!! 


Watch the video here:

Products used:
MAC Pro Longwear Foundation - NC40
NYX Jumbo Eye Pencil - Rust
Coastal Scents 88 Warm Palette
Coastal Scents 88 Ultra Shimmer Palette
MAC Mineralize Skinfinish - Soft and Gentle
MAC Fluidline - Black Track
NYX Eyebrow Cake Powder - Dark Brown
Covergirl Lash Blast Fusion Mascara - Black
NYX Concealer in a Jar - Glow
NYX Loos Powder - Cancun Tan
La Femme Hollywood Blush - Cinnabar
Avon Lip Gloss - Maple Sugar

I hope you've enjoyed that! Stay tuned for my False Eyelash Tutorial, coming up tomorrow!

Hugs and Burgundy kisses
Mandy

Friday, 23 March 2012

MockingJay Eyes

I am so very excited about this tutorial for a number of reasons! First of all, I absolutely LOVED the Hunger games Trilogy. I read all three books in just over 24 hours. And yes, I read very quickly as a rule, but I really just could not put them down! Now the movie of the first book is out TODAY!!!

There have been several Hunger Games inspired tutorials on Youtube in the past few weeks. Check out a few of my favourites:


Angie's Avox Tutorial

Heather'sCapitol Looks Part Un and Part Duex

Leesha's District Series

SO I was wondering what I should draw my inspiration from, and then I hit on the answer. The MockingJay! You have to have read the books to understand the significance of this little bird.


It's a pixie-like, elegant little black and white bird, and I had fun trying to echo the lines of the bird's body in my eye makeup.

I thought of the MockingJay's forked swallow-like tail and her peaked crest and sharp little beak and came up with this sort of eye shape.
 

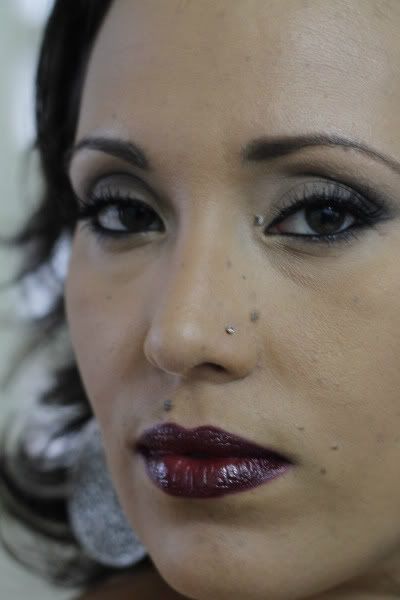
The eyes from the front. I'm super proud of this look! One special (and very important) element of this look is the very faded eyebrows. I wanted a slightly more exotic, other-worldly feel to these eyes, and I achieved that by making my eyebrows all but disappear. All these photos are completely unretouched, by the way!

 The rhinestones are my special tribute to Rue, the 12 year-old Tribute from District 11. The MockingJay is important to Rue as well. I was picturing Rue and the flowers. Again, you must read the book! I refuse to give any spoilers! So the rhinestones stood in for flowers because I didn't want to get THAT literal, still wanted to keep an element of artistry.
 I forgot to stick my nose ring back in...I look so naked!

In the video, which you can watch below, I promised I'd show you a picture of the Dark Soul Pigment. See why it reminds me of lumps of coal, with the subtle sparkle?


You can watch the video here: 

Products Used:

Mac Paint Pot - Soft Ochre
NYX Jumbo Eye Pencil - Milk
Avon Big Color Eye Pencil - Night Glisten
NYX Eyeshadow - Geisha
MAC Pigment - Dark Soul
NYX Eyeshadow - Root Beer
LA Girl Fine Liner Pen - Black
MAC Fluidline - Black Track
CoverGirl Lash Blast Fusion Mascara - Black
MAC Pro Longwear Foundation - NC40
E.L.F Complete Coverage Concealer Palette - Medium
LA Colors Loose Powder - Light/Medium
NYX Loose Face Powder - Cancun Tan
La Femme Hollywood blush - Sienna
NYX Eyelashes - #164
Duo Lash Glue
Clear Gloss
Nail Art Rhinestones - 1mm and 2mm

Please go give a thumbs-up to this video on YouTube (If you liked it, that is) and subscribe to my Channel!

May the odds be ever in your favour! (couldn't resist)
Mandy

A Very Belated St Patrick's Day!

I had so many issues with this video. First i couldn't film it to my satisfaction. Then my computer shut down while I was editing and I had to start from scratch (stupid me forgot to save). Then I had issues uploading. *whew*

As a result, the video was two days late. But better late than never! I'm just REALLY early for St. Paddy's Day 2013!!!


I went for bold, yet elegant style with the swept back hair and the green scarf with the black shrug. The feather earrings made it just weird enough to be me. ;)


The eyes were a lovely combination of greens.


I kept the rest of the face warm and glowing.


I hope you enjoyed your Green Beer!! Until next time!

hugs, kisses and four-leaf clovers,
Mandy

FOTD - Last week

I did an OOTD two weeks ago and got quite a few compliments on the face! In was in the mood for purples that day...


This was very bright and springtime-y...nevermind it's always Summer in Barbados (i.e. HOT).


Please ignore my caveman-esque brows...

Here's the OOTD video: 


Oy, the thumbnails that youtube chooses for you!! Horrid! LOL!


I know this hardly makes up for me missing so many blog days...LOL. I've got a back log so I'll keep uploading diligently.

Love and purple kisses,
Mandy

Tuesday, 14 February 2012

Nails of the Day!

Hallo Beautiful People!

Happy Valentines to you all!!!

I've been horrendously sick with a head cold/tonsilitis and my internet connections seems to have caught the same virus as me! LOL Hopefully the guys from the provider will get it back up and running soon.

So whil I have a small window where I can actually post stuff, I just thought I'd show you what I put on my nails today. Painting my nails makes me feel good. I just have an obsession with manicures and different nail polishes and nail art (although I'm not very good at nail art. I'm practicing).

Today I went with one of my absolute favourite neutrals. Now before you start moaning about how boring neutrals can be, take a closer look at this one. It's called "My Private Jet", by O.P.I.


It's a super stunning dark golden-brown-taupe colour, but what is REALLY stunning about it is the duo-chrome micro-glitter that runs through it. The glitter gives the polish a depth and a hint of glitz without being over the top. It's a sexy colour that goes well with any and everything I've ever worn it with - Red, Black, White, even Purple. It's neutral so it doesn't scream look at me, but it's still enough to make a statement. SO I'm wearing two coats of that, and one coat of Seche Vite on top.

Here it is in partial shade.

 And in bright sunlight.

Sooooo pretty! I love it.

Have a great day!

Hugs, kisses and pretty polishes,
Mandy

Thursday, 9 February 2012

Vampy Valentine

Hey Beauties!!

I'm soooooo excited!

Today is my birthday! I'm off to dinner tonight, and right now I'm eating a piece of delicious cake that my neighbour Richard brought me. Rich is a very sweet older gentleman that's been a friend of my mother's family for years. I'm going out to dinner with the hubby tonight!

To celebrate I am buying myself Samatha Chapmans' RealTechniques Brushes! Sam is one half of Pixiwoo on Youtube and the creator of these amazing brushes.

I've been dying to try these brushes for a while now, so when I get them I'll definitely review them!

I also have another reason to celebrate: I'm uploading my very first ever Makeup Tutorial on Youtube!!

I filmed this yesterday, and although I only have a Flip, I think it came out ok. I'm still of course getting the hang of lighting and zoom and of course, staying in frame, but I think it's a pretty darn good first effort!! It's a sexy, kind of vampy look that I'm wearing for my Birthday, but it would also be sexy for a Valentine's date if you like a more sultry kind of look.

These were my inspirations: Kim Kardashian with her super sexy eyelashes:


And one of my favourite characters from True Blood, Lorena. I fell in love with this early 1930s look of Lorena's.

So here's the finished look on me!


I'm having a great birthday. Here's a bonus pic if the whole family.

You can watch the video here! Please remember to subscribe!


Hugs, kisses and birthday cake!
Mandy

Thursday, 2 February 2012

Makeup by the Duck Pond

On one rainy morning, We headed up to a beautiful spot in Kendal, St. John - The Duck Pond. It's a natural freshwater pond on old Plantation land, and is home to hundreds of ducks. The road bends sharply twice right around this pond, and it's along one of the rally routes in Barbados. But it's also a stunning spot.


The ducks just belong to the plantation, they're not bred for commercial use or meat, they simply live free on the plantation, fed by the workers, and protected by the management. They're all comfortable with people, and even walk along the road without fear. Funny enough, they hardly ever get killed in the road. Drivers follow an unspoken rule that they drive very carefully around this pond, especially because the road curves so sharply, it can be dangerous to drive it. During a rally, the ducks are herded and kept away from the road by a spotter.

We had secured a bunch of dresses, and had a bunch of girls model for us. Two of them were professional models, two were friends that we were just dying to get our hands on. We enjoy working with amateur girls as much as professionals because we hand pick them for their beautiful, interesting faces and what we always see strengths in them that we love to help them realize in front of the camera. 

In addition to makeup, I usually help direct the shoots, a la Mr Jay from America's Next Top Model. Aly trusts me to help her get the best out of our models. Our friend Gigi Ma'at was the hairdresser for the day.

I'll show you two of the four girls in this post, Rebekah and Jessica. Rebekah, Bex to us, has been a dancer all her life, but she is not a professional. She has milky white skin, a beautiful face with stunning hazel eyes, and edgy, red hair. She wore a gorgeous rich brown bridesmaid's gown, by Bajan designer Pat Blackman, that really warmed her skin up. This was photographed along the straight stretch of road leading to the first sharp bend.


I had done Bex's makeup before for parties and fetes, and I had a look that I really was dying to try an arabic look on her. This was the face that took the longest that day. I kept the skin cool in colour because the brown warmed her up, and I knew I'd be using reds, coppers and peaches on her face. I didn't want her to end up looking too red in the face! Be mindful of the way that the colours you wear and use on the face interact. In this case I used an Ivory foundation with a very neutral, yellowish undertone. I did quite a bit of concealing around Bex's mouth as she has quite a bit of acne scarring on her chin and cheeks. I used the buffing method described by Wayne Goss to hide the scars. Check out his video here. I got some of my inspiration for this look from Julia (Misschievous on Youtube). Check out the video here.

Bex has such big eyes that she can handle a lot of makeup, and I love that her face is quite soft and gentle. I love the juxtaposition of lots of edgy makeup on her gentle features. I used a black cream base blending up quite high and used a dark coppery purple on the lid, defined with matte black, and blended in the crease with a dark burgundy colour. I used  liquid liner because my Fluidline had dried up, so getting the sharp liners was actually a bit of a challenge. I find I just don't have as much control with a liquid as I do with a gel. You can't really see it in the photos but I gave her three little wings gradating up into the long sharp wing, like in Julia's video. I also carriend the liner a little lower done on the inner corner to elongate the eye, although I didn't do the exaggerated innor point that most arabic makeup features. Instead I opened the liner on the lower lashine into the inner corner.

By far my favourite part of this eye makeup was that open line at the inner corner. The highlight colour was Amber Lights from MAC, a gorgeous, luxurious gold colour.

I kept the cheeks peachy/bronze, and then just for a little couture glam, I kept the lips a cool pink.


A bonus shot showing off Bex's awesome tattoo. It extends right down below her waist, but that would be a whole different kind of photoshoot! ;)


Jessica is a professional surfer and model. I had never met her before that day, but as soon as I saw her beautiful bronze skin and stunning face, I was super excited to get my hands on her! 

The dress we chose for her was a stunning black creation with a corset and bustle. It was heavily beaded and had lace overlay. It was designed by the talented Bajan desiger Antonio Cumberbatch for PoshPunk. Aly photographed Jess in the grove of mahogany trees around the far side of the pond, but the rain was falling and getting heavier and so we didn't get to do as much with her as we wanted. The rain gave a beautiful hazy, romantic feel to the shots, though, so we weren't that mad!


I love this shot. It has a very mysterious, romantic, Twilight-ish type of feel to it.


Jess' eyes are a green hazel, she has incredible bone structure, and her skin is absolutely flawless and bronze. I used very little foundation on her, and I kept her cheeks bronzed and somewhat scultped. the lips were soft and nude.

The eyes were a look I'd been waiting on the right girl to try - a messy, punky, khol-rimmed eye. I used my fingers to spread a creamy black all over the lip and along the lower lid. I wasn't trying to be neat. I actually wanted it to crease a bit, and so I had Jess squeeze her eyes shut a few times before I patted on a matte black shadow, also with my fingers. I did that cycle twice more - applying more creamy, having Jess blink, and patting on matte black - to make the eyes extra inky black and sultry.


I absolutely love the messy fishtail braid that Gigi gave Jess, inspired by my messy khol makeup.

For a wearble, adaptable version of this looks, check out The Kristen Stewart makeup look by Lisa Eldridge here. I have two more girls to show you from this day, so stay tuned!

Love, hugs and cuddly ducks,
Mandy

Tuesday, 31 January 2012

Make Up Every Day

Hallo Beauties! How go the makeup experiments?

It's always fun to experiment with your makeup. You learn what works best for you and what doesn't work at all, and you learn shortcuts and techniques and all that good stuff.

I experiment all the time, I'm always trying new colours or shapes or techniques. Especially because I'm self-taught, these experimenting sessions have been invaluable lessons for me in learning and practicing techniques, and also it helps me learn to recognize immediately what looks and colours will work, what won't, and I also practice different shapes so that I'll know how to modify the look instantly for whatever face I'm putting it on. Makeup skill is a muscle, it needs to be constantly worked out and kept strong or it will atrophy.

I'm also always photographing myself. I'm sure people think I'm vain, but I like to test the effect of light and shadow and angle on different kinds of makeup and certain looks. It always helps when I'm deciding on a model's makeup if I know before hand how it reacts to being photographed, even if on a different face.

So here are a few shots of me, taken with either my trusty phone camera or my little Nikon Coolpix digital camera, at various times (a lot of the time in my car, on my way to or from some errand or job). These are some of my favourite go-to looks. :)

This is one of my most used go-to looks. When I took this first pic I was a little pale, owing to the fact that my baby was only about 6 months old and I spent every waking moment (that I wasn't working) with her! I live in a tropical island and there's a certain amount of colour that you get just from being outside, even though I do of course wear sunscreen.

This is a really simple look - clean skin (not naked, I just mean a clean finish with foundation), softly defined eyebrows for shape, and khol-rimmed eyes. I used the Avon Big Color Eye Pencil in Night Glisten all around the eye, blended it a bit either with my fingers or a domed blending eyeshadow brush (I love the one by E.L.F. and the fluffier one by Revlon) and then packed a black eyeshadow over the creamy pencil to set it (My go-to black eyeshadow is Carbon from MAC). Line the top and bottom waterline, add a nude lipstick (here I think it was a nude lip liner all over the lips and a chap stick on top for a velvety finish) and go!

This next pic is of me and my husband. We were going to a dinner event for his work at the time. Baby was around 5 months old at this point, and I was still enjoying the flawless, glowing skin I had from pregnancy and breastfeeding (which I did for 10 months). This look focused on a super healthy glow, so I used foundation, concealer wherever I needed it, and a bronze-pink blush, and then I dusted the bronzer all around the perimeter of my face and into the hollows for a bit of sculting and glow. The eyes were actually quite simple. I'll do a post on this look by itself because it's a look that is so easily adapted, suits everyone, and you can change the lip or the cheek up to suit you and the event you're going to. 

 My "No Make Up" Makeup. I focused on keeping the skin flawless, just highlighting the high points of the face and the eyes, and shaping the eyebrows well. I almost ALWAYS line my top and bottom waterline (it's just my thing) and apply two or three coats of mascara since I have wimpy little eyelashes - Here I remember I was trying out the Covergirl Lash Blast mascara and LOVED it, although the phone-camera doesn't realy do the lashes justice. For the lips, I just covered them with foundation too and then used a peachy lipgloss on top. I did use an E.L.F. bronzer on my cheeks but the phone camera and overcast day sort of washed that out too in this pic.

 This is another of my most favourite go-to looks. I had just cut my hair super short (sort of almost buzz-shaved at the back and a layered longer on top) and I pinned the longer pieces back. I defined the brows as always, used a slightly shimmery shell-coloured eye shadow all over the eye, a medium brown shadow for defining the crease, and then a thick black eyeliner. You could make the liner thinner but I like it thick. I used a pencil liner and set it with Carbon on a tiny pencil brush to soften the edge. You could also use a gel eyeliner and then the black shadow, but a liquid eyeliner would be too sharp. Plummy blush and a raisin lipliner all over the lip, toppped off with a plummy lip gloss, and the look is complete!

This look is pretty much the same as the last  one, just with the liner in a slightly different shape. I do like to play with shapes depending on how I'm doing my hair. In the last look it wasn't winged out like this one is, it was a little more blunt and a bit thicker, giving a slightly rounder eye shape. I have naturally quite slanted eyes, and in the first look I wanted them to appear a bit bigger and rounder. In this second incarnation of the look, I extended the liner a bit, sort of the way Angelina Jolie or Megan Fox do theirs, in a long triangle shape that extends a little ways along the lower lashline to pull the eye outward. The lip is a little lighter than the last look too. And as you can see, the hair is a little more grown out, and I went for sideswept bangs.

 This look is just a more dramatic version of the first one, using matte black, and dark silver and pewter eyeshadow colours to blend the black out farther and up into and slightly past the brow bone. The highlight colour was a mixture of MAC MSF in Soft and Gentle and a sheer lavender colour.

 This look uses one of my favourite pigments - actually one of my favourite eyeshadow colours period - from MAC, called Deep Blue Green. I got it years ago, and I think it's called something else now, but it's a stunning dark peacock teal. I generally use it over a creamy black base to deepen the colour even more. It's one of my most beloved colours and I wear it like this for performing (I sing) or for when I want a dark eye without actually using black. MAC MSF in Soft and Gentle again is the highlight colour for the brow bone and the cheek, and I used MAC Bare lipstick over blanked out lips.

The lighting on this pic is awful - it makes me look all sweaty when I swear I wasn't! But the makeup, I love!! It's all plummy and burgundy...I use a NYX jumbo eye pencil in the color Rust as a base. It's a gorgeous rich burgundy red colour. Over that I used two E.L.F. Brightening Eye Color Quads, Day 2 Night and Luxe. I used the burgundy from the Luxe quad on the lid and the dark purple from the Day 2 Night quad in the crease. I layerd both colours on the bottom lashline too, using the burgundy and then the dark purple over it just in the lashline. For some more definition, I used MAC Fluidline in Black Track with a tiny pencil brush on the top and bottom lashline for a soft line, and I lined the waterlines with Black Track as well (it stays all night!!). MAC MSF in Soft and Gentle is my go-to brow and inner corner highlight colour, and I used my Maybelline Fit Me blush in Deep Coral and a plummy lip gloss topped it off.

And as a last little bonus, here's my wedding-day makeup (And my beautiful red wedding dress)!! This photo was taken after the whole thing was over, I was sooo tired! We left for our honeymoon about 10 minutes later. The arms and head you can see in the shot belong to Aly, the photographer I work with. She was a Bridesmaid. 

The Makeup was black smoky eyes, blended out with a warm reddish-brown, a soft shimmery brow highlight, and gorgeous lashes (can't remember any of the brands), and finished off with warm bronze skin. I didn't wear any lipstick, only chapstick. I'm bless with pretty dark-coloured lips naturally, and I figured that after the Wedding Kiss and then greeting all those people and sneaking a kiss here and there with my husband (*wink*) lipstick would just be a waste. So I got away with Chapstick on my wedding day!
 Thanks to Khalil for this photo!

Look at how long my hair was! It was past my waist, and I'm not a short woman! I chopped it off after my daughter was born, but that's a whole 'nother story. The colour, though, is all my own natural hair colour. :)

Happy Make-Up Experiments everyone!

Hugs, kisses, and red wedding dresses,
Mandy